
Adding Smooth Locomotion To Unreal Engine 5.1+ For VR (Open XR)
What are we creating?
In this blog post were going to take a look at setting up a smooth locomotion system for VR using Unreal Engine 5.1, using Epic’s default VR template provided through the Epic Launcher as a starting point.
Before starting please read through the tutorial before following along. I’m saying this because we will need to create custom collision channels to stop our player from colliding with grabbable objects and also exploring Unreal’s new Enhanced Input System which itself can be quite confusing for those starting out. In past tutorials, people skip ahead and it doesn’t work because they ignore the collisions section.
If you need any help during this tutorial, please join our 1700+ user Discord server where we can help you out if you need it.

Shout Out To Corysia
Before we get started, a big shout out to Corysia over on the GDXR Discord server for figuring out all of this, to begin with, and allowing me to make tutorials on it. I recommend checking out their Youtube, and Github and they can also be found on Discord @ Corysia#1040. And often helping out in the GDXR Discord server as one of our awesome moderators. Go check out the cool stuff they’re currently working on.
Patreon - Download the files.
This tutorial was also made possible by our Patreon’s, Their support allowed me to put the time into writing/creating tutorials like this. If you'd like to support content like this please consider subscribing to the GDXR Youtube channel or heading over to our Patreon. While you are there you can also download the files for this tutorial to save yourself some time.
With Unreal Engine 5.1 VR Template open, we can get started.
Setting Up Enhanced Inputs
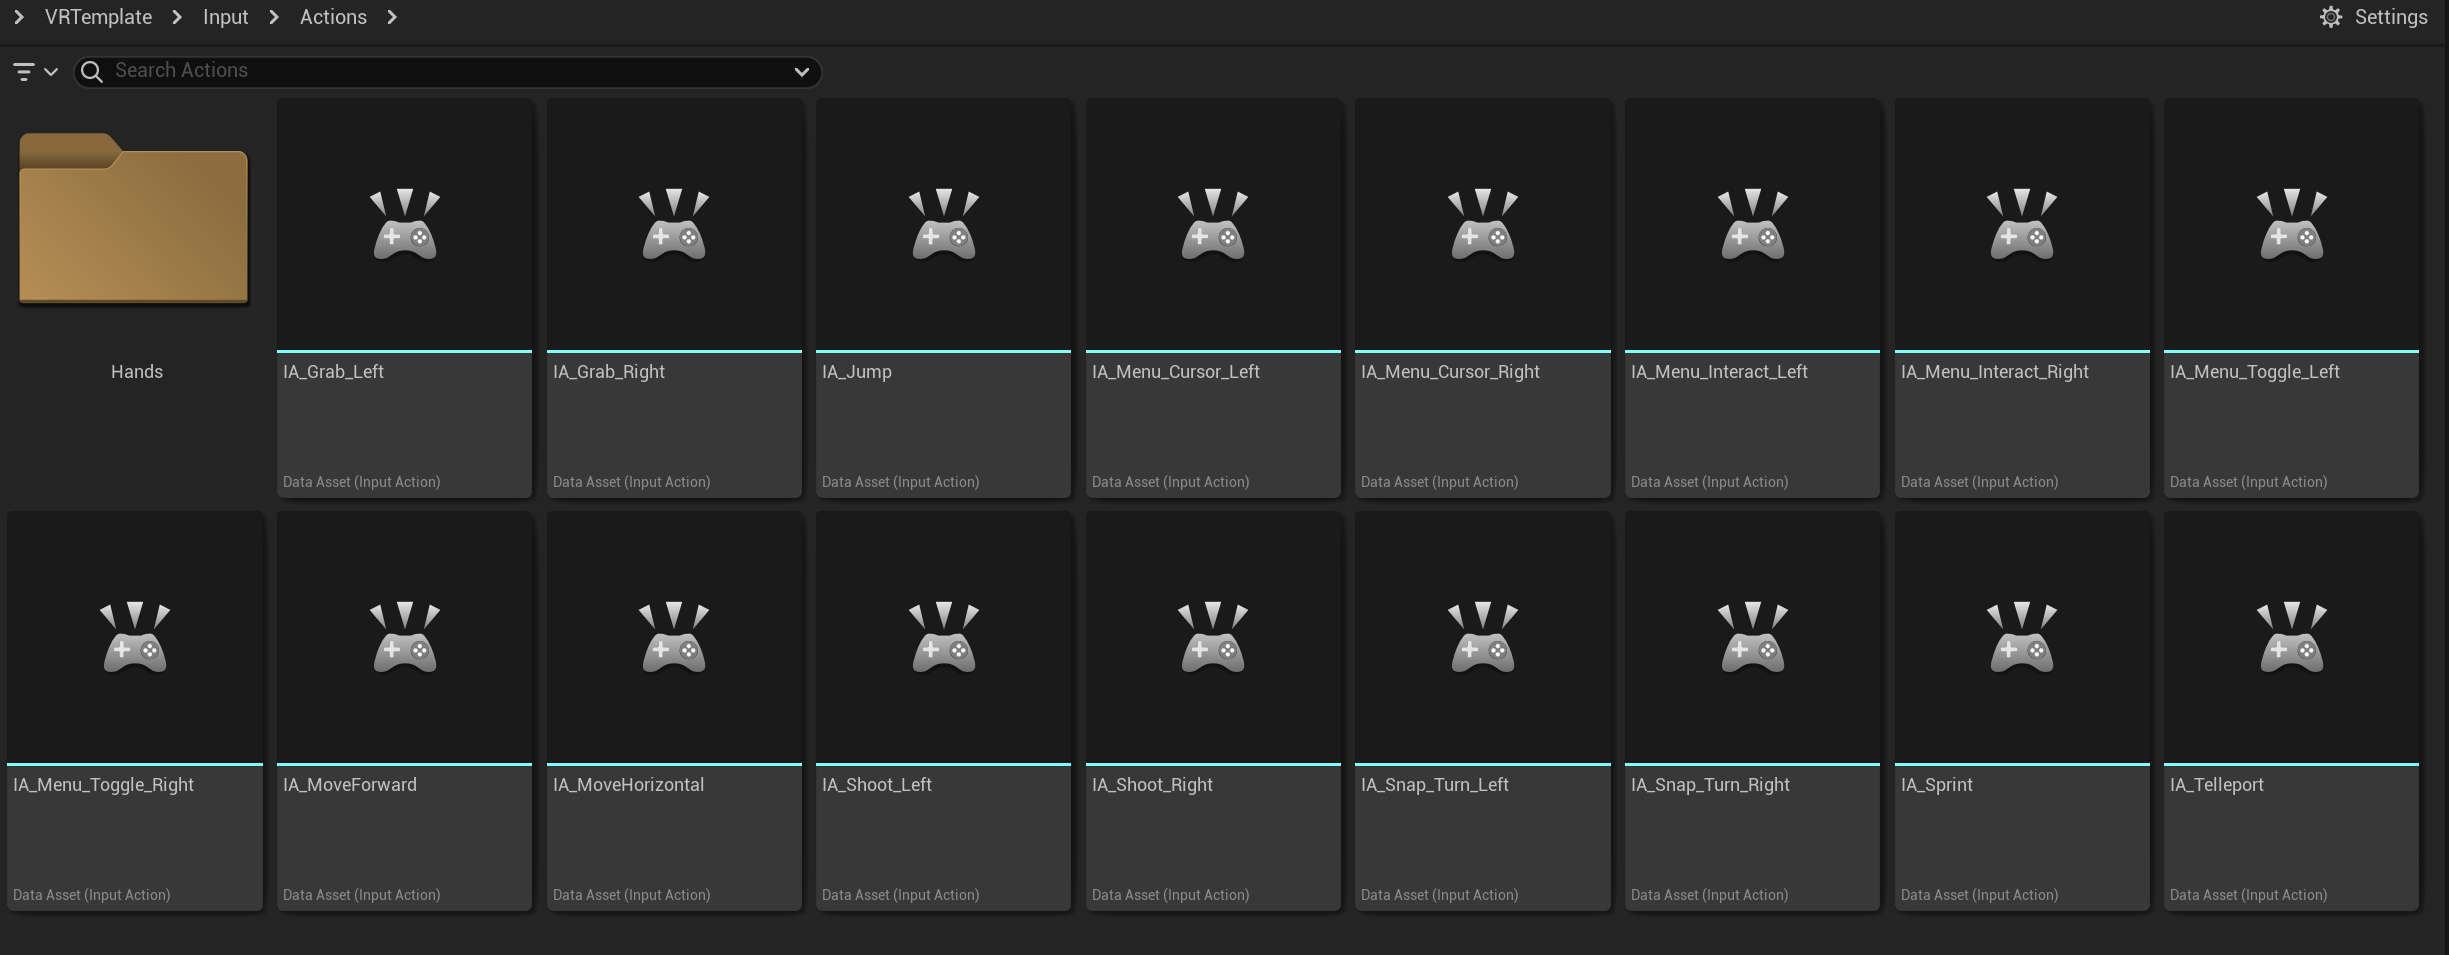
The first thing were going to do is head to our content browser > VR Template > Inputs Folder.

You can see here we have some files with the prefix IMC which stands for input Mapping Context, this is where we can add our inputs. However, before doing that we need to create some actions. Head to the Actions folder to view some that already exist.
What are actions?
In their basic form Input actions are our individual inputs. In the old version of unreal these were created inside the project settings. But now we can create them here to provide flexibility and reusability to our project. Input Actions can be re-used in multiple blueprints with different button mappings. This is what allows us to remap our inputs when changing movement methods in the GDXR VR Template over on the Epic Games Market Place.
Standard inputs come in four types but for this tutorial, we will only be looking at two, Bool and Axis 1D inputs.
1. Boolean inputs work by saying if a button is on or off. (Bellow is an example of an input for toggling menus, you can see the value type is set to Digital(Bool).

Menu Toggle input action showing value type bool to control on/off inputs (Button press) if the button is pressed bool = on, if released bool = off.
2. Axis inputs saying if a button has a path from -1 to 1 with a default of 0. Think thumbsticks and triggers which can tell how far they have moved when interacted with.
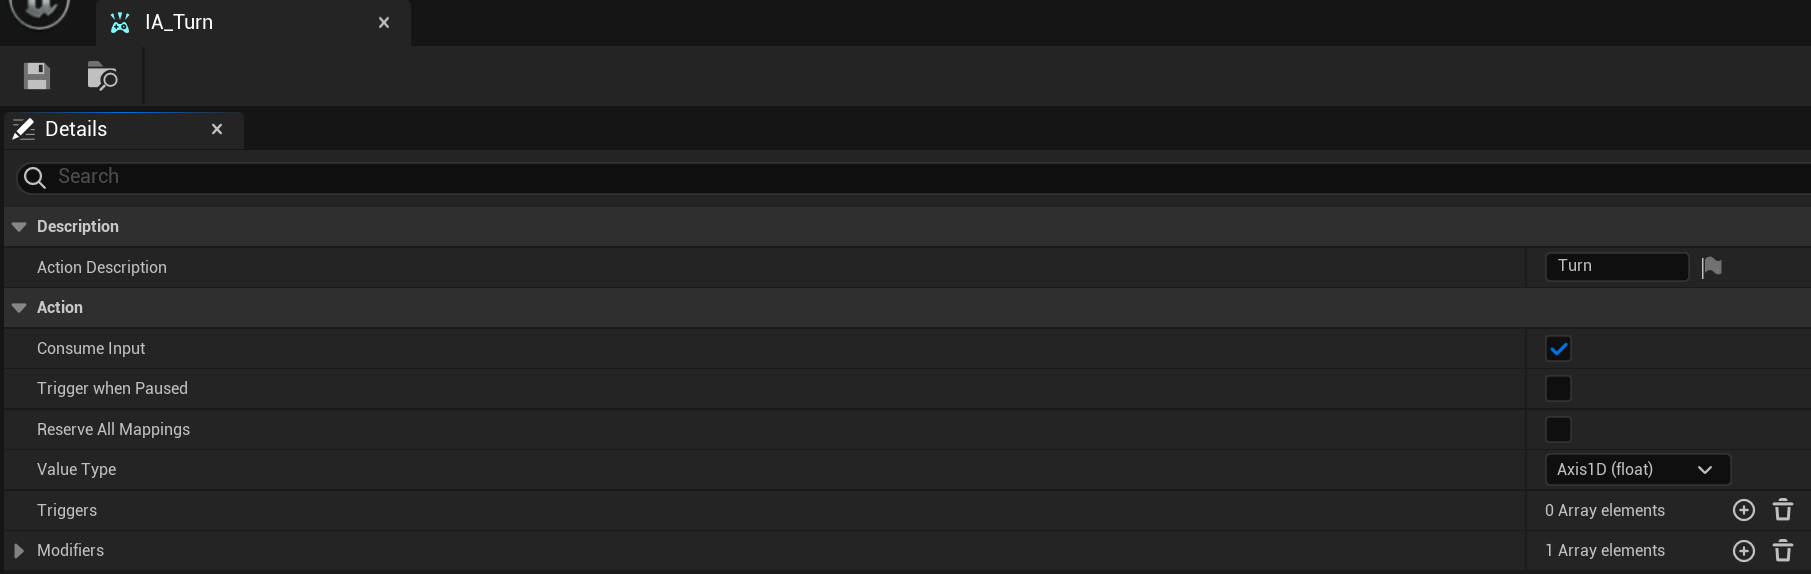
Input action controlling turn rotation, this example has an Axis1D (float) which looks at the input to see what position the input is currently in. Thumbstick left will be -1, right slightly will be 0.4 give or take.
Note: Action Descriptions may cause the engine to crash if duplicated, Make sure Each IA (Input Action) has a unique Description or none at all. DO NOT DUPLICATE.
For a more in-depth breakdown of how to use the enhanced input system, I recommend the video bellow showing a full walk through.
Creating Our Input Actions for Smooth Movement
We need to create five new input Actions. You can do this by duplicating existing mappings with the same Value type that we require or we can create them from scratch. It’s up to you but I’ll show how to do it from scratch.
In your Actions folder right click > Input > Input Action

Creating a new Input Action in the actions folder
These Inputs will require there own Value Type in relation to there inputs and what they do these will be:
Jump | Value Tpye = Type Digital(bool) / Consume Input = True
MoveForward | Value = Axis1D (float) / Consume Input = True
MoveHorizontal | Value = Axis1D (float) / Consume Input = True
Snap_Turn_Right | Value = Axis1D (float) / Consume Input = True / Modifiers = DeadZone
Sprint | Value = Type Digital(bool) / Consume Input = True
Were going to need Five Input Action’s and they will be called
- IA_Jump
- IA_MoveForward
- IA_MoveHorizontal
- IA_Snap_Turn_Right
- IA_Sprint

Snap turn right Modifier example, adding deadzone
Actions folder after adding new Input Actions (I renamed default IA_Turn to IA_Snap_Turn_Left).
Now we have our Input actions set up we can begin setting up our Input Mapping Context located in the VRTemaplate > Input Folder.
I found the easiest way of doing this was to duplicate the IMC_Default file and to rename it to SmoothLocomotion, this way we don’t have to manually set up as many inputs.
Duplicate IMC_Default and rename it to IMC_SmoothLocomotion

Select the IMC_Default > Right Click > Duplicate

Rename the IMC_Default to IMC_SmoothLocomotion
Then Open it up. Your window should look like the image bellow, this is where we set up our actual inputs for each controller type we plan to support. For VR (Open XR), It’s a lot.

Opening the Smooth Locomotion Input Mapping Context
If you would like to support telleportation while using smooth locomotion DO NOT remove the IA_Move. Keep it and then add the new inputs as well. In my case i removed it as i didnt need to teleport.
First thing to do here is to delete IA_Turn and IA_Move. We’re doing this because we created new Input actions called IA_Snap_Turn_Right and IA_MoveForward so they will both be replaced.
At the top, by the word Mapping, you will want to click the plus + sign to add a new mapping (unfortunately this has to be done one at a time).
Once you create a new mapping you will need to add the Input Actions that we created. Do this five times till all your new inputs have been added to the list. I also gave the file the description SmoothLocomotion (DO NOT DUPLICATE DESCRIPTION BETWEEN INPUT MAPPING CONTEXT FILES, IT WILL BREAK THE MOTION CONTROLLER TRACKING).

How your Smooth Locomotion Input Mapping Context should look after adding your input actions.
With our Mappings added we can open them up and begin adding our controller mappings.
Rather than doing a screenshot for each input, here is the extended list.
Take your time and double-check your inputs. I added every platform for accessibility but you don’t have to, only add the inputs for the target platform.
Vive devices requiring the wave plugin (Vive Focus 3) are not currently supported at the time of writing this tutorial.


We’re almost done with our inputs. If we were to add our inputs to the VR Pawn now they wouldn’t work.
We need to first add our IMC_SmoothLocomotion to the Player Mappable Input Config File located in the VRTemaplate > Input Folder
We do this so the OpenXR plugin can read our new inputs.

Player Mappable Input Config File located in the VRTemaplte > Input Folder
Open the PMI_VRTemplate file and in the context drop-down, we will need to add the new IMC_Smooth_locomotion file we created to the list. Like so:

Adding IMC_Smooth_Locomotion to the contexts list
With this complete, inputs are ready to be added to the VRPawn although we do need to change the mapping context when we get there.
Setting Up Our VR Pawn And Converting It To A Character Class.
Before we can begin coding we need to change the default parent class of our vr pawn from Pawn to a Character parent class.
To do this, open the existing VRPawn blueprint.

Open the existing VRPawn
At the top of the BPPawn Window select Class Settings.
On the right in the VRPawns details panel you will now have a drop-down option called Parent class.
Search for character and select it.

converting our VRPawn to a character parent class
Setting up our new scene component
This will change your VRPawn’s component hierarchy as it adds some new content for us. But before we fix it we need to create a scene component.
Select the new capsule component that has been added to the components list.
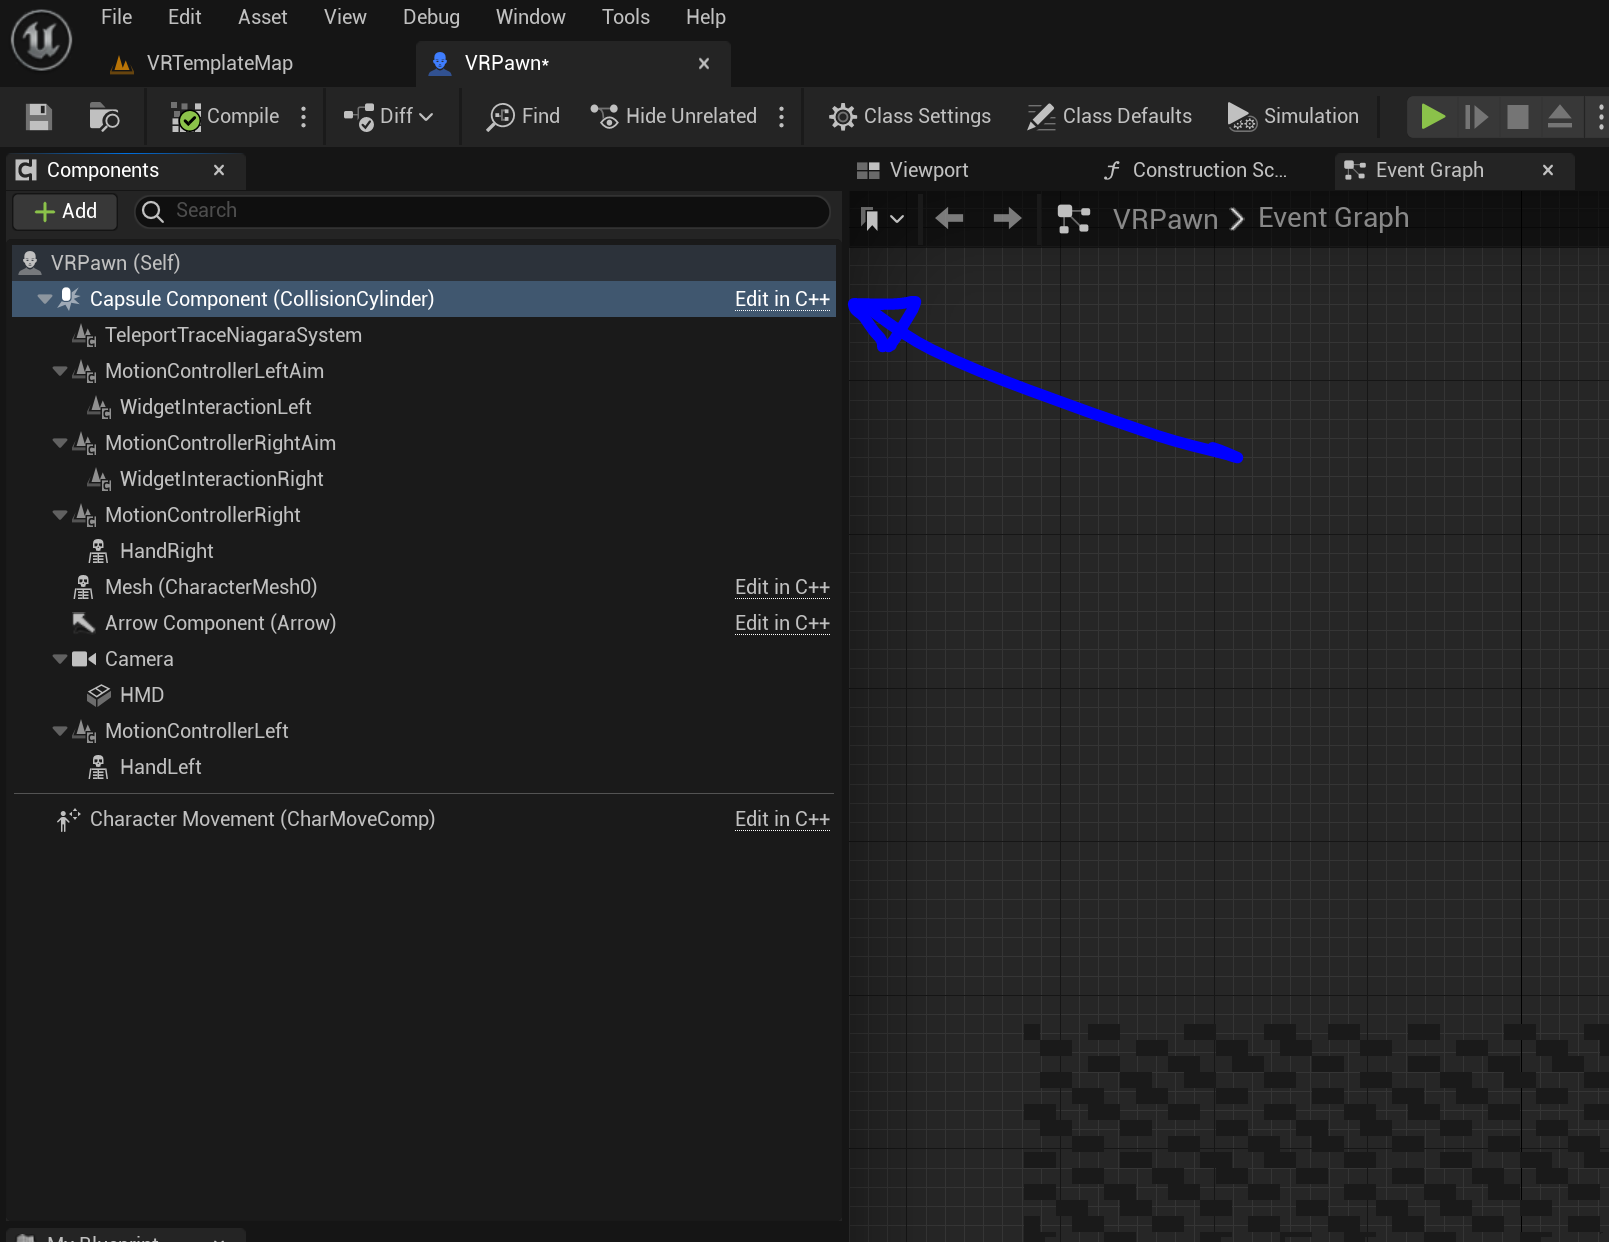
Select the new Capsule Component that was created.
Select the green plus button and search for “scene” under the Utility heading and add it to your components list.

Adding a scene component to our VRPawn components list
Start by renaming the new scene component to “VRCharacterOrigin”.

Add the new scene component and renamed it to VRCharacterOrigin
After adding the VR Character Origin, we need to re-organize our Components hierarchy. Almost every other component except for Arrow and Mesh should be a child of the VRCharacterOrigin component.

Before Fixing Component Hierachy
After Fixing The Component Hierarchy
With our component hierarchy recreated we need to select the VRCharacterOrigin and set it’s Z value to -90. this will spawn us on the floor and make us the correct height when playing.

Set the VRCharacterOrigin to -90 on the Z axis
Adding our Smooth locomotion Input Mapping Context to the VRPawn
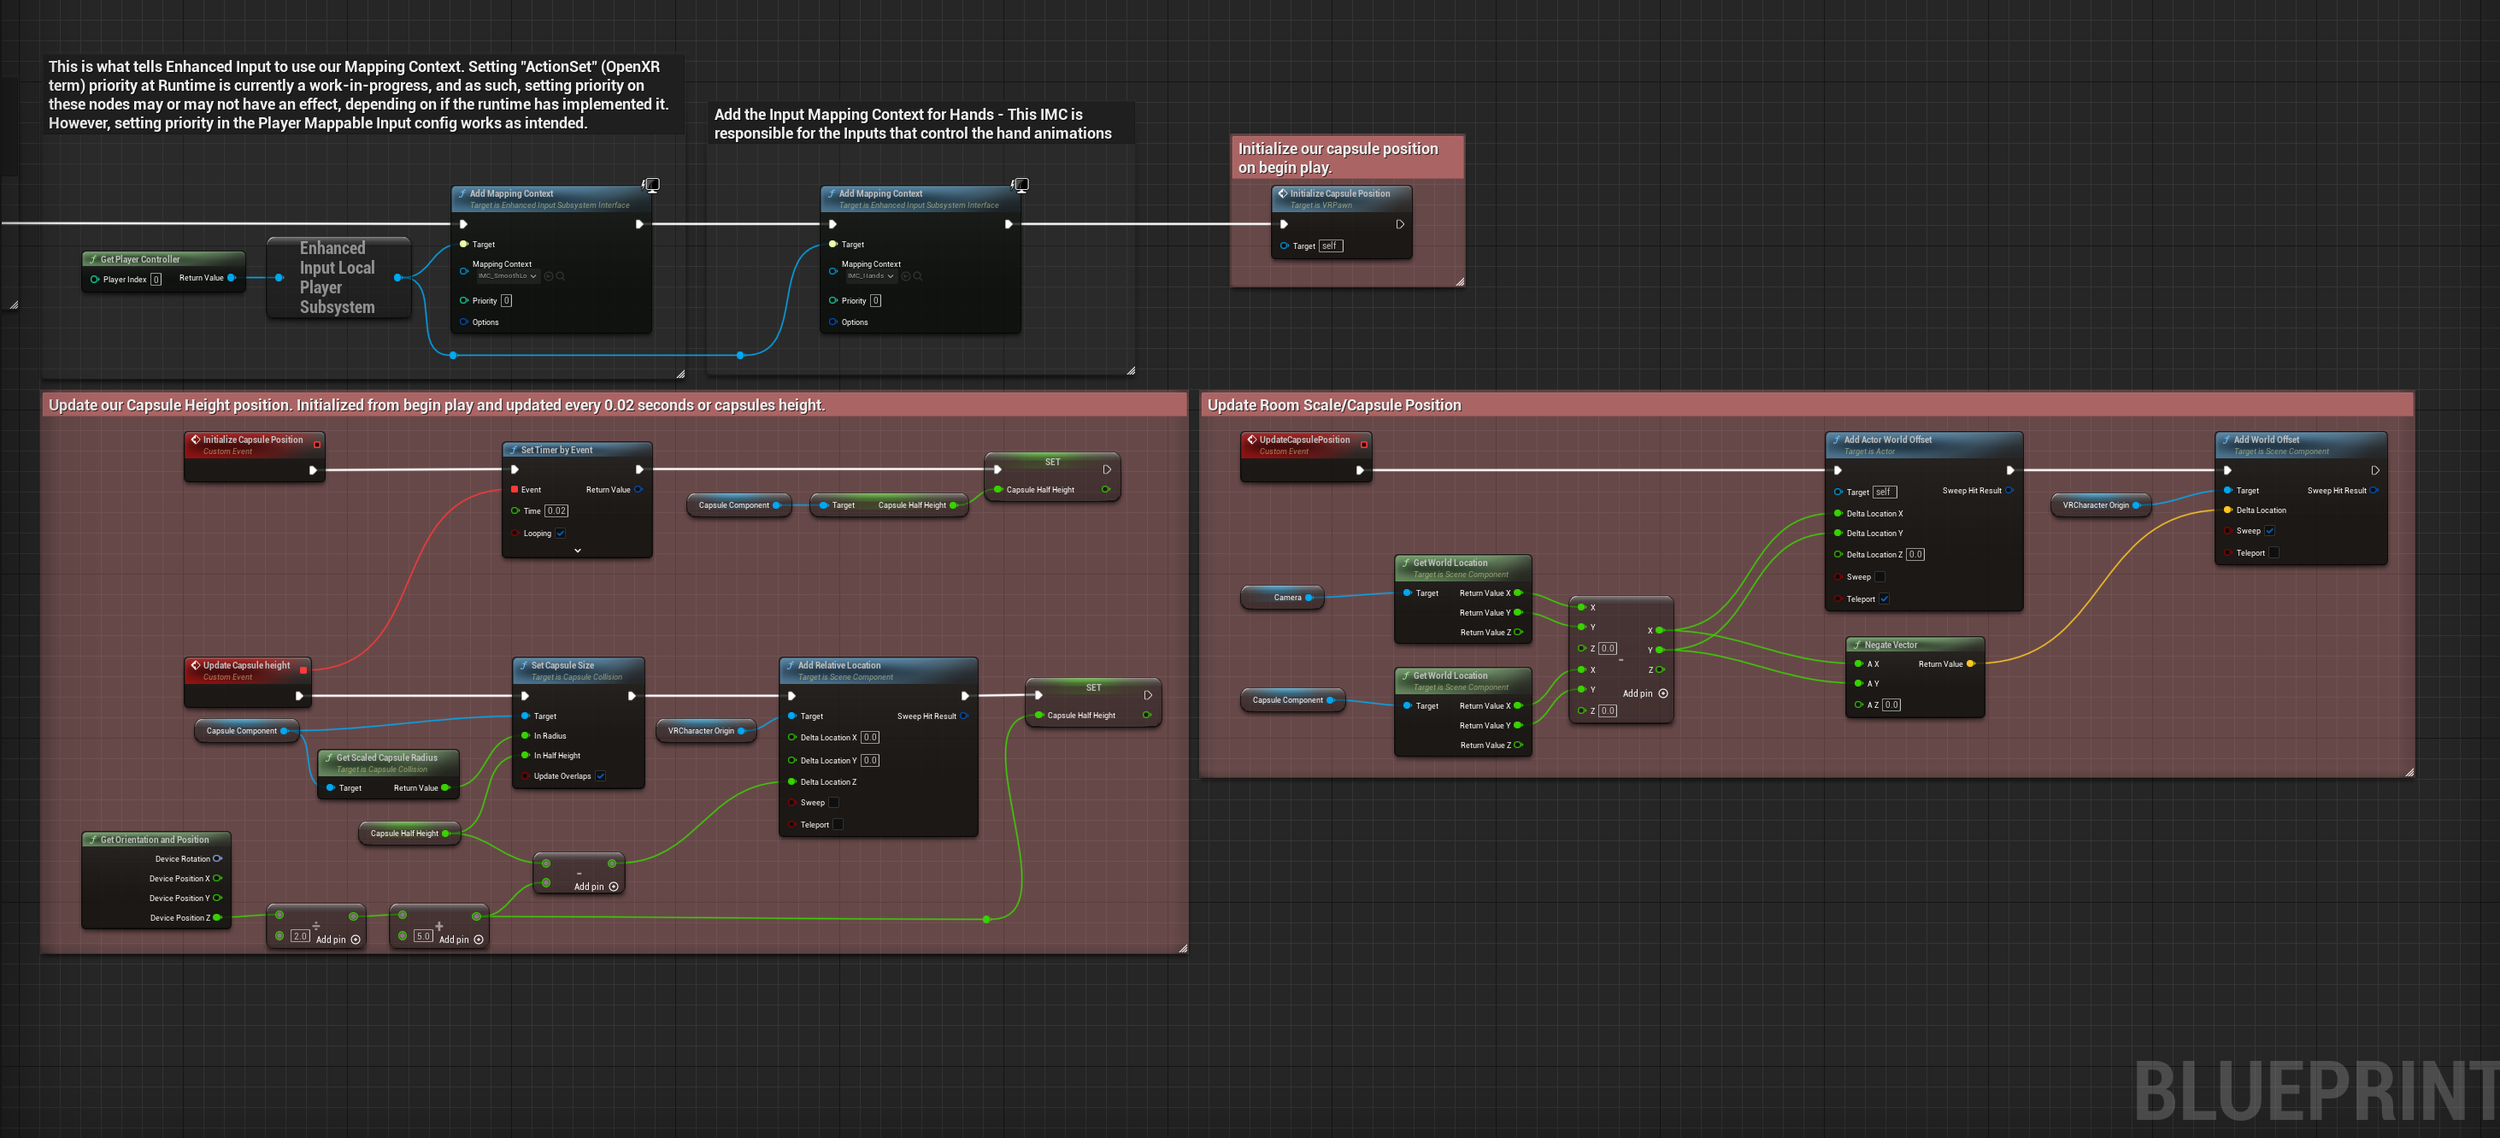
By default, the VRPawn has a section of code containing the function “Add Mapping Context” which is fired from the VRPawns Event “Begin play” node.
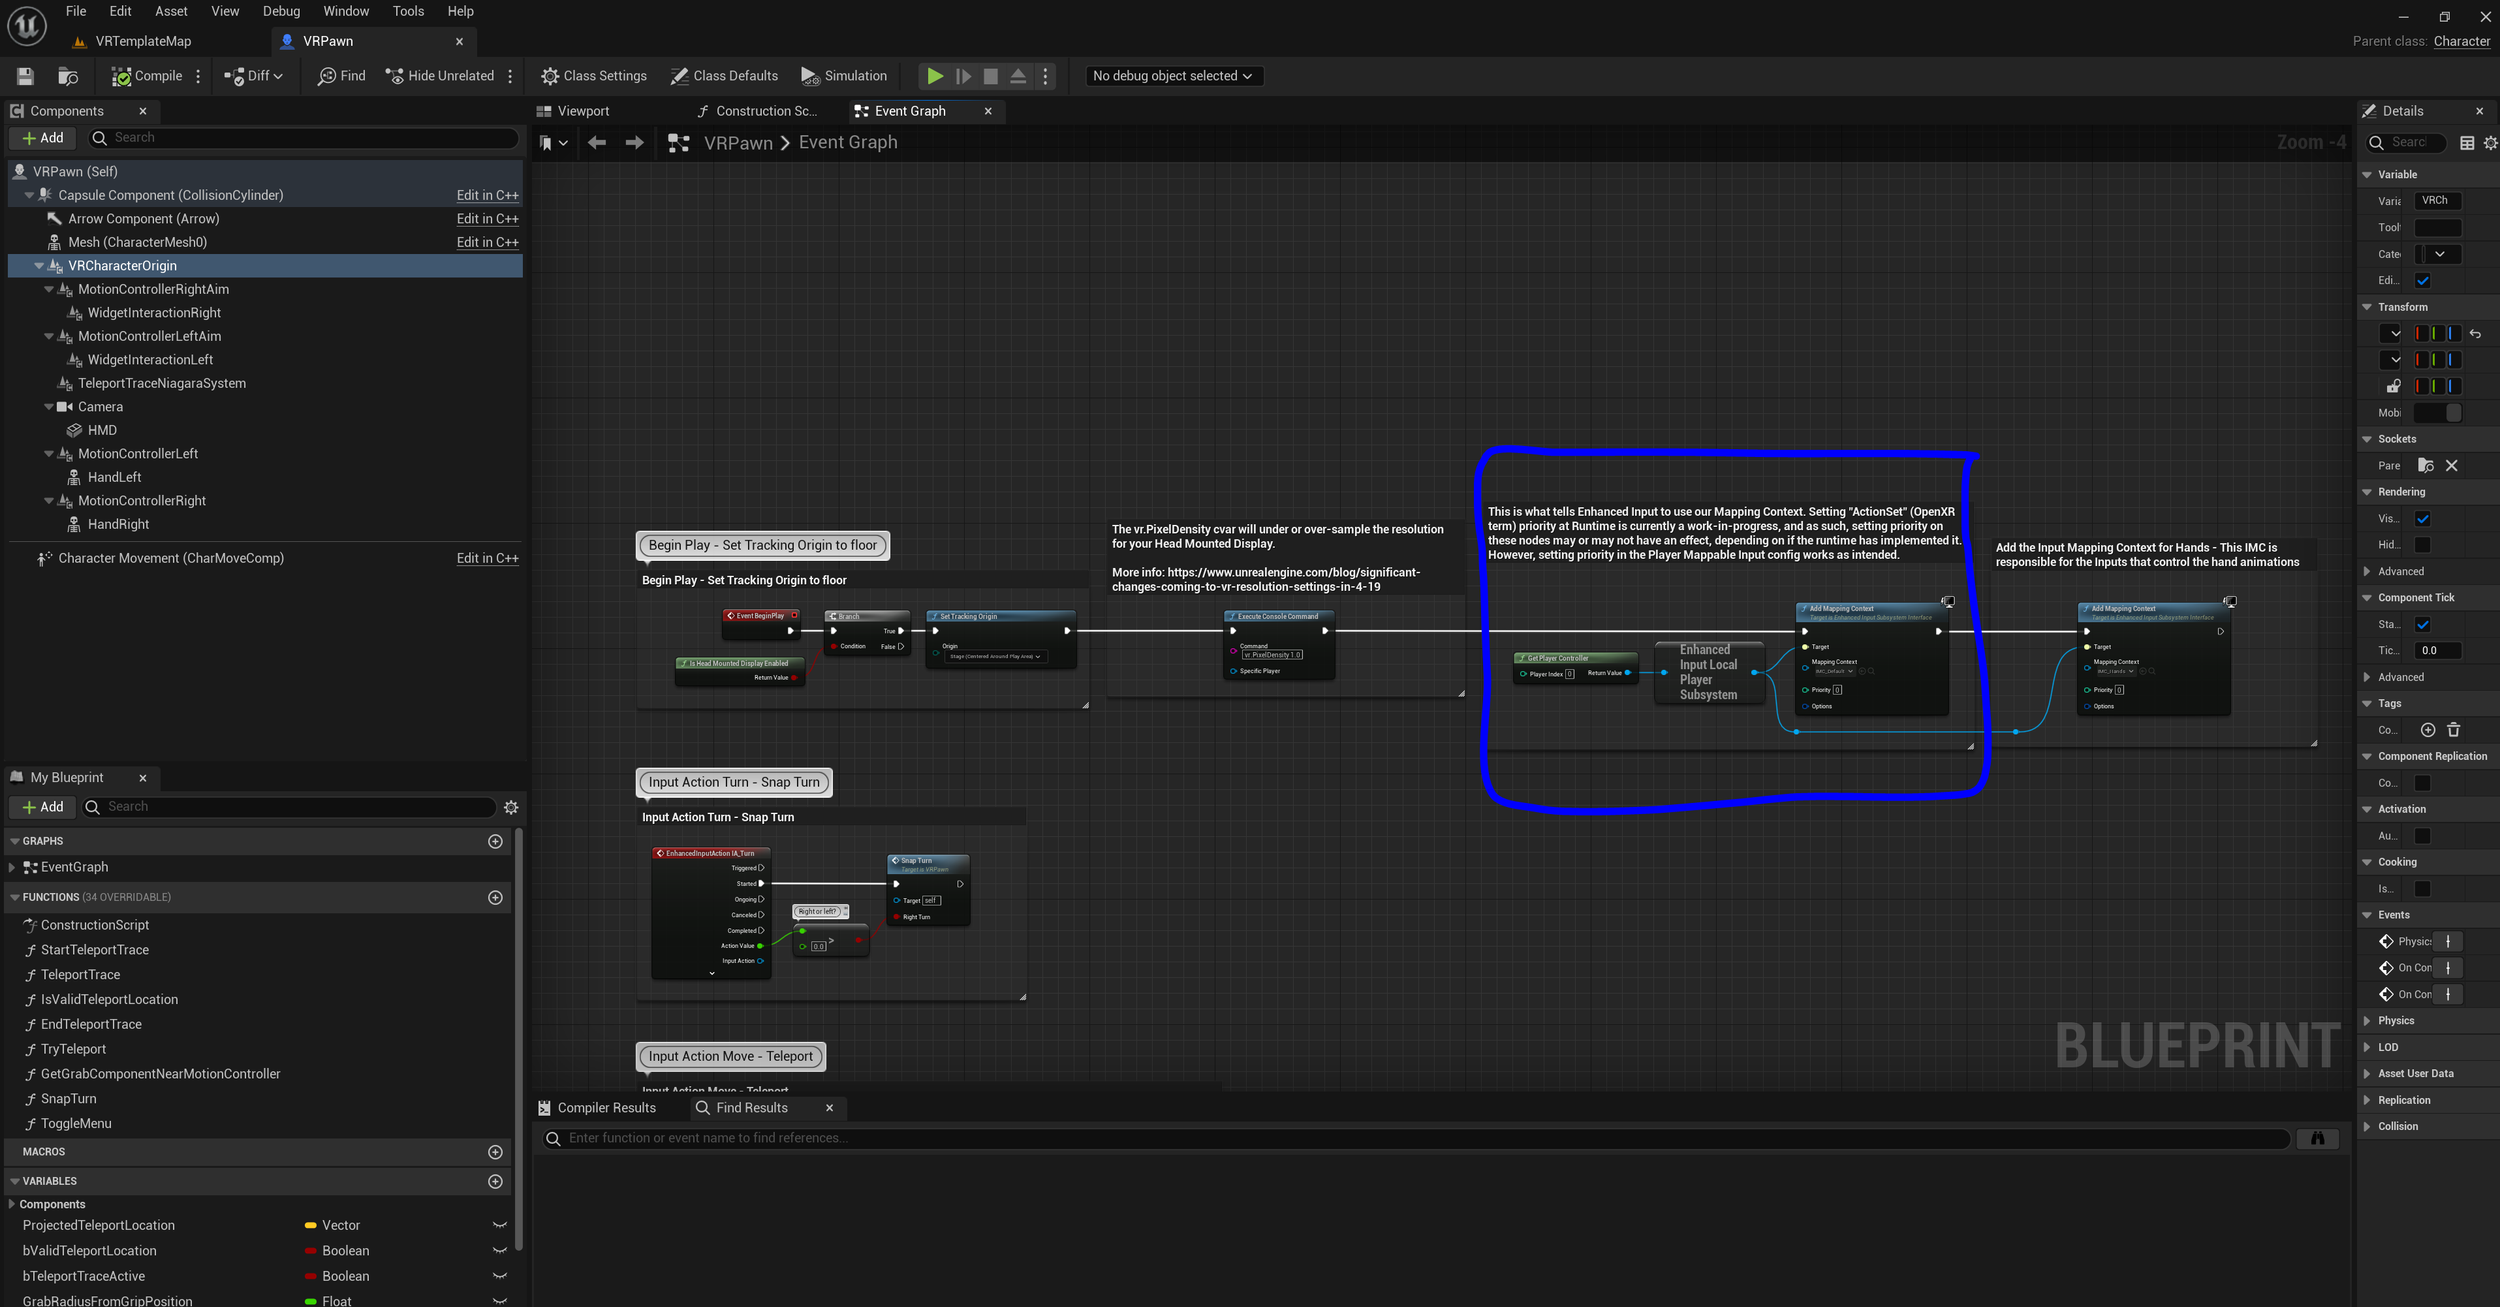
Existing “Add mapping context” function which we will change.
Rather than re-inventing the wheel, we can simply change the existing add mapping context, mapping context to IMC_Smoothlocomotion.
You can see the mapping context is now using the IMC_Smoothlocomotion Context
Now we have added our Mapping context, it would be good practice to check our inputs are working correctly before moving on.
To do this we can add one of our new inputs.
Im going to add the IA_MoveForward and use the triggered channel to fire a print string node. This will continuasly fire the print string when I push forward on the left controller.

Added IA_MoveForward with a print string node.

Input test code

Seeing our print string fire when testing our input in game
Now we have confirmed our inputs are working, we can delete that code for now as we will be using the inputs somewhere else later on.
If your inputs DO NOT WORK, make sure the hmd is on your head when testing. If that doesnt work make sure you added the IMC_Smoothlocomotion to the PMI_VRTemplate File.
Setting Up Room Scale (Updaing our Capsule Position)
Because im targeting mobile VR (Meta Quest) with my setup I like to have control over when the code is activated, becasue of this i’ll be using a set timer by event instead of using the Event tick, this will let you stop the capusle being updated on tick if you need to.
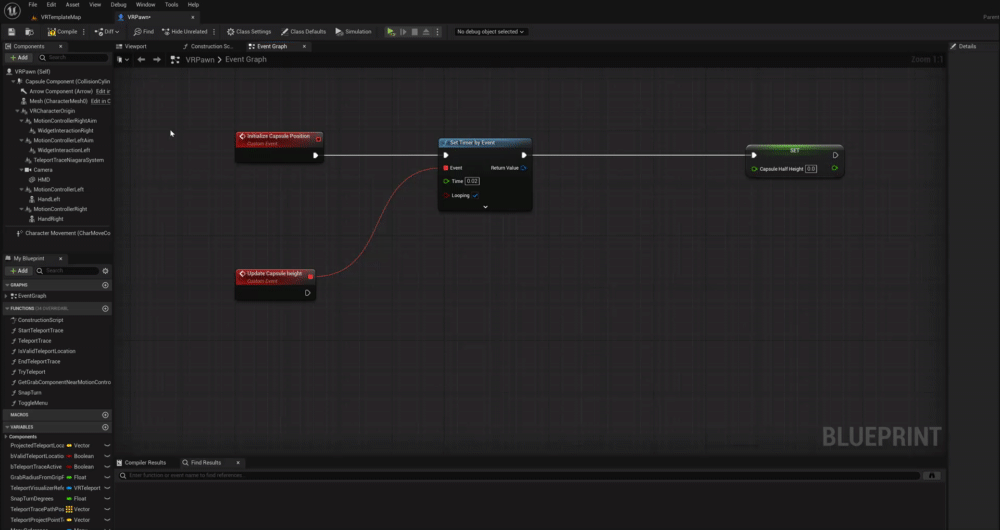
Start by creating a “custom event” and naming it “Initialize Capsule Position”

Created a custom event named “Initialize Capsule Position”
From the Initialize Capsule Position event Create a Set Timer by Event function and then create a custom event from the input and name it “Update Capsule Height”, make sure to set the time to 0.02 and set looping to true.

Create a new custom event and call it “Update Capsule Height”
Before setting up the Update Capsule height code, we need to create a new float variable and call it “Capsule Half Height” and Connect it to the set timer by event function.

Create a new float variable called Capsule Half Height

Added Capsule Half Height float variable to our Set time by event function
We now need to drag in a refrence to our VRPawns CApsule component (Top left of the window). from the capsule comnponent variable we created, drag of the blue pin and get the Capsule half height, connecting it to the Capsule Half Height float variable we created.
Get a refrence to Capsule component and get the Half height, connect it to the capsule half height variable we created.

Should look like this.
We can now set up our capsule Height logic.
First thing we need is a refrence to our “Capsule component”, and from the refrence we need to “set the Capsule Size” and also “get scaled Capsule Radius” (Capsule radius can only be found by dragging of the capsule component).

Getting our capsule refrence and “Set Capsule Size” function
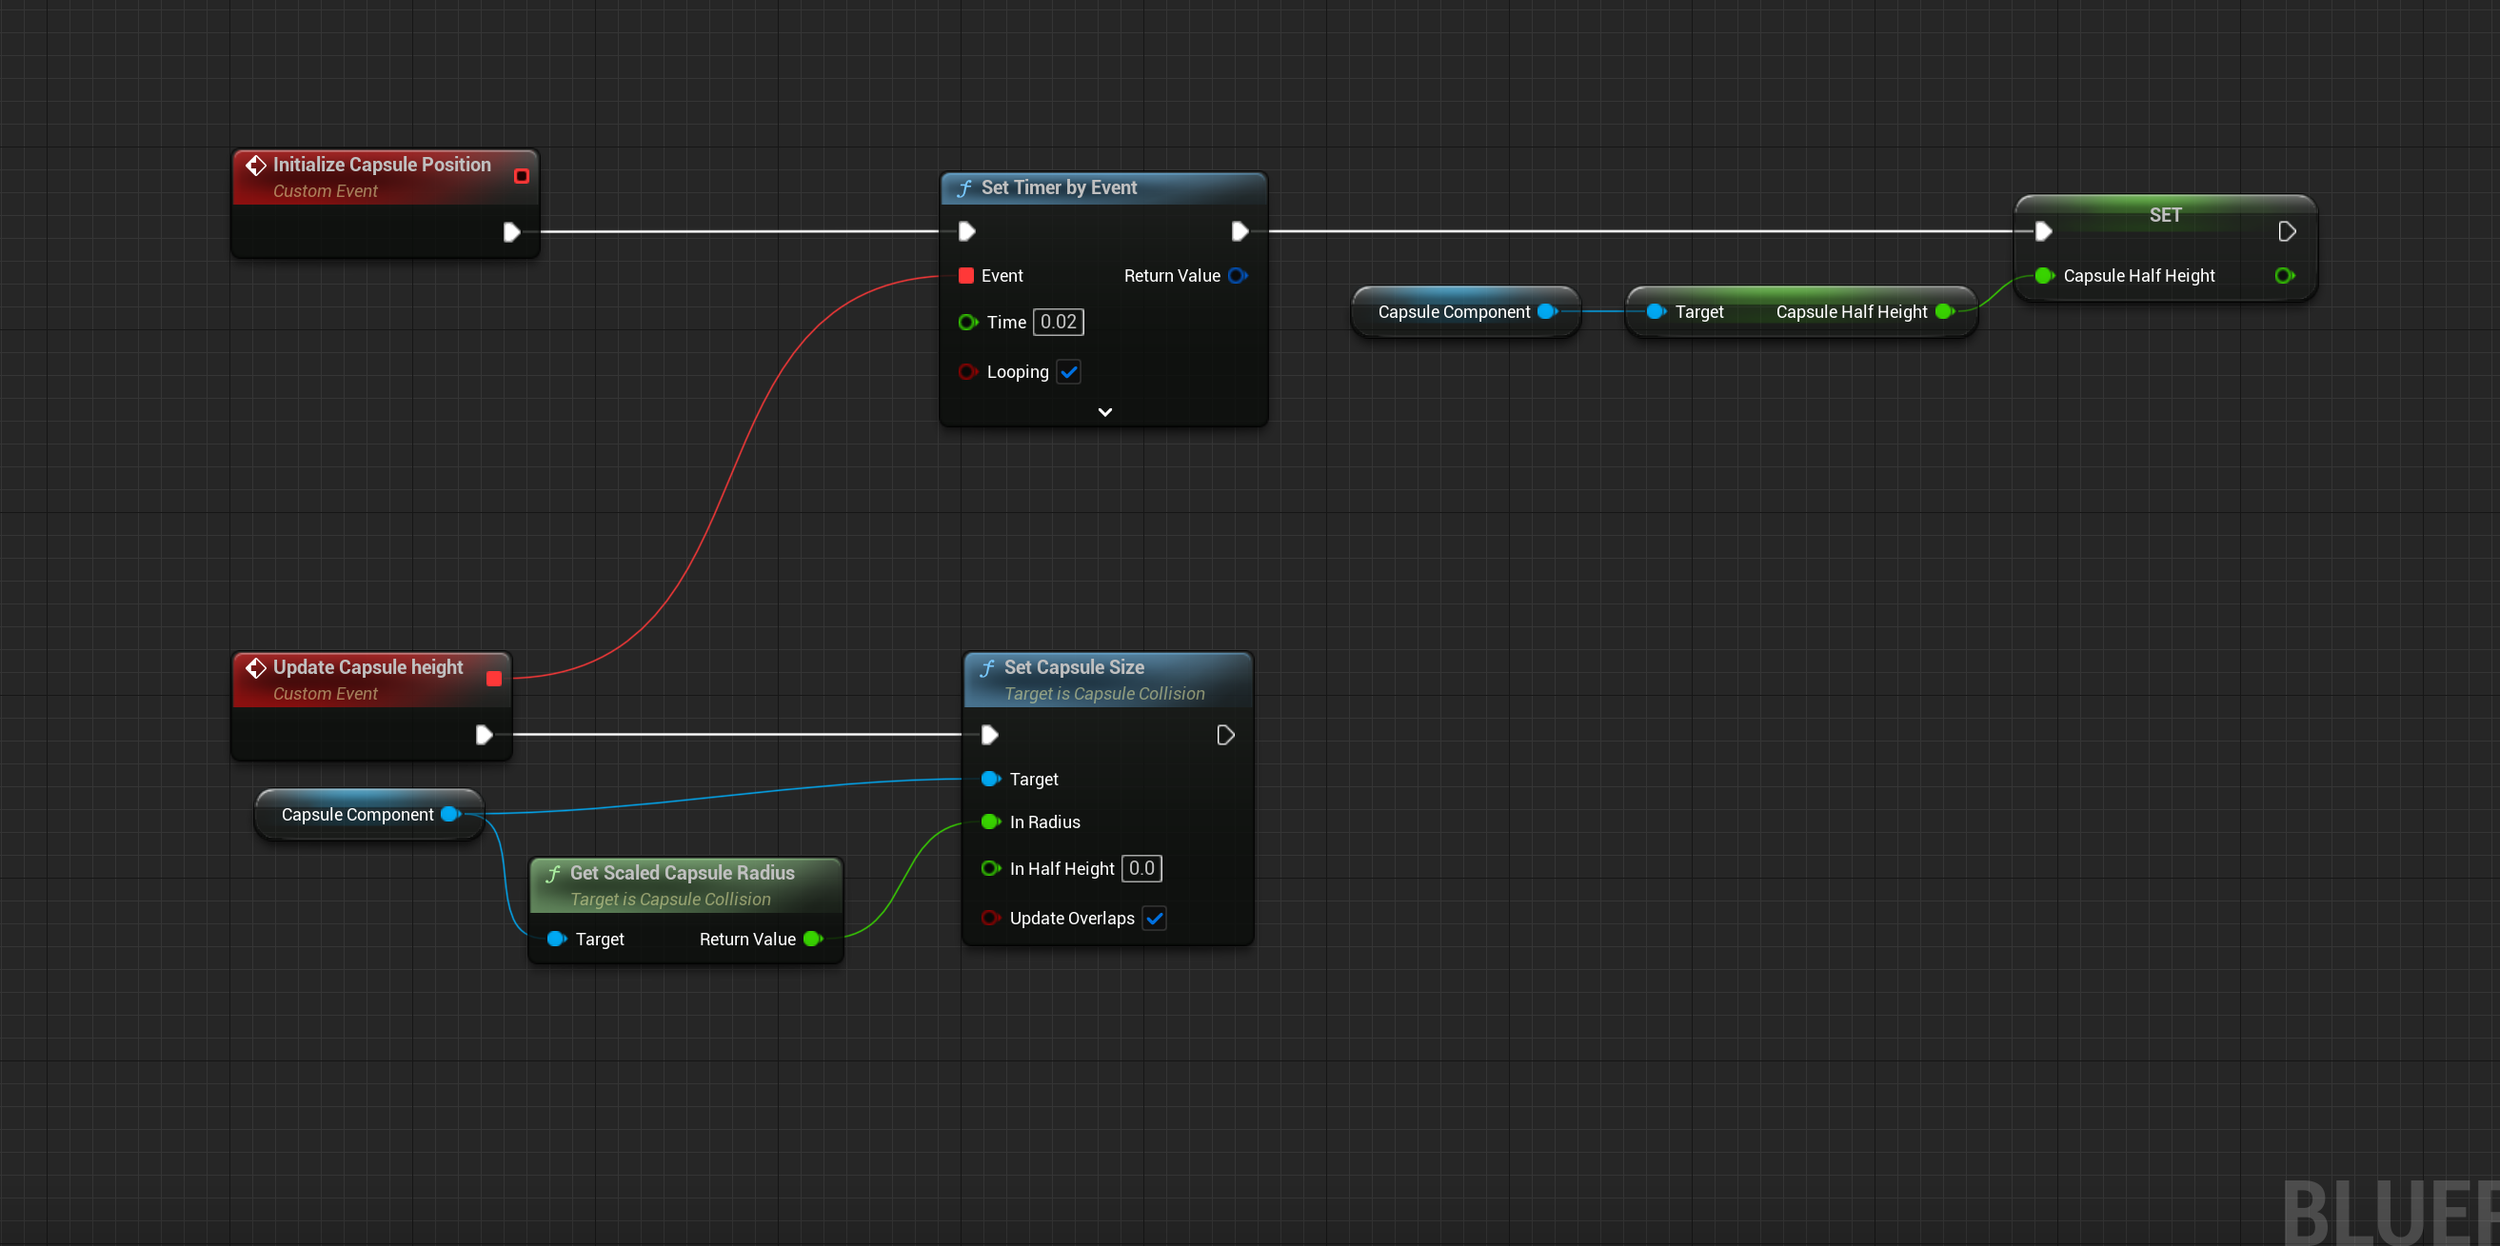
“Get Scaled Capsule Radius” from the Capsule component refrence. connect it to the inb Radius of “Set Capsule Size”
Drag in a get variable of the Capsule Half Height float variable we created and connect it to the In Half Height of the “Set Capsule Height” Function.
connect our “capsule half height” float to In Half Height
From our “Capsule half height” float, we need to drag off and creat a subtract node.
We now need to right click and “Get Orientation And position” Function and split the position pin so we can access the Device Position Z, we are then going to divid Z by 2 and Add 5. Connecting it to the subtraction node we created.
The divide halfs our device z and the add, acomidates for the top of our head.

Split the device position pin and divid by 2.

Add 5 and connect it to the Minus node
Drag in a refrence to our VRCharacterOrigin component and add relitive location.

Get the VRCharacterOrigin and add relative location
Split the delta location pin and connect the minus node to Delta Location Z

Split the Delta location pin and connect Z to the Minus Node.
We now need to set our set capsule half height to our pluss node.

Our code should look like this.
So far we are setting the height of our capsule based on the devices Z position where we then update our character origins Z position to stay on the floor.
Witht he section of code complete we can now activate it by calling the “Initialize Capasule Position” custom event on begin play and comment the code section.
Im going to add the Initialize Capasule Position after our mapping context are added.

Setting Up Room Scale (Make our capsule component follow our Camera/Head)
In this section, we are going to set up our room scale movement, We will be making the capsule component align with our head and will update the VRCharacterOrigin to match. Doing this is what will stop us from walking through walls, and static meshes in our levels.
The first thing to do is finding a blank area of the graph and create a custom event, Name it UpdateCapsulePosition. Then search for the function “Add Actor World Offset”.

Create a custom event and add the function “Add Actor World Offset”
We need to drag in two references, one for our camera and one for our capsule component. We will also ned to get the world location of both components.

Split the Get World Location for both nodes and also split the Delta Location.
we now need to subtract the Return X and Y locations from each other and use the return to set the “Add Actor World Offset” Delta X and Y locations.

Create a subtraction node, convert it to a vector, and split all pins.

connect the nodes like so. X to X Y to Y, you get the gist.
We now need to negate our vectors and add world offset to our capsule component.

Getting the Negate vector function and splitting the A pin
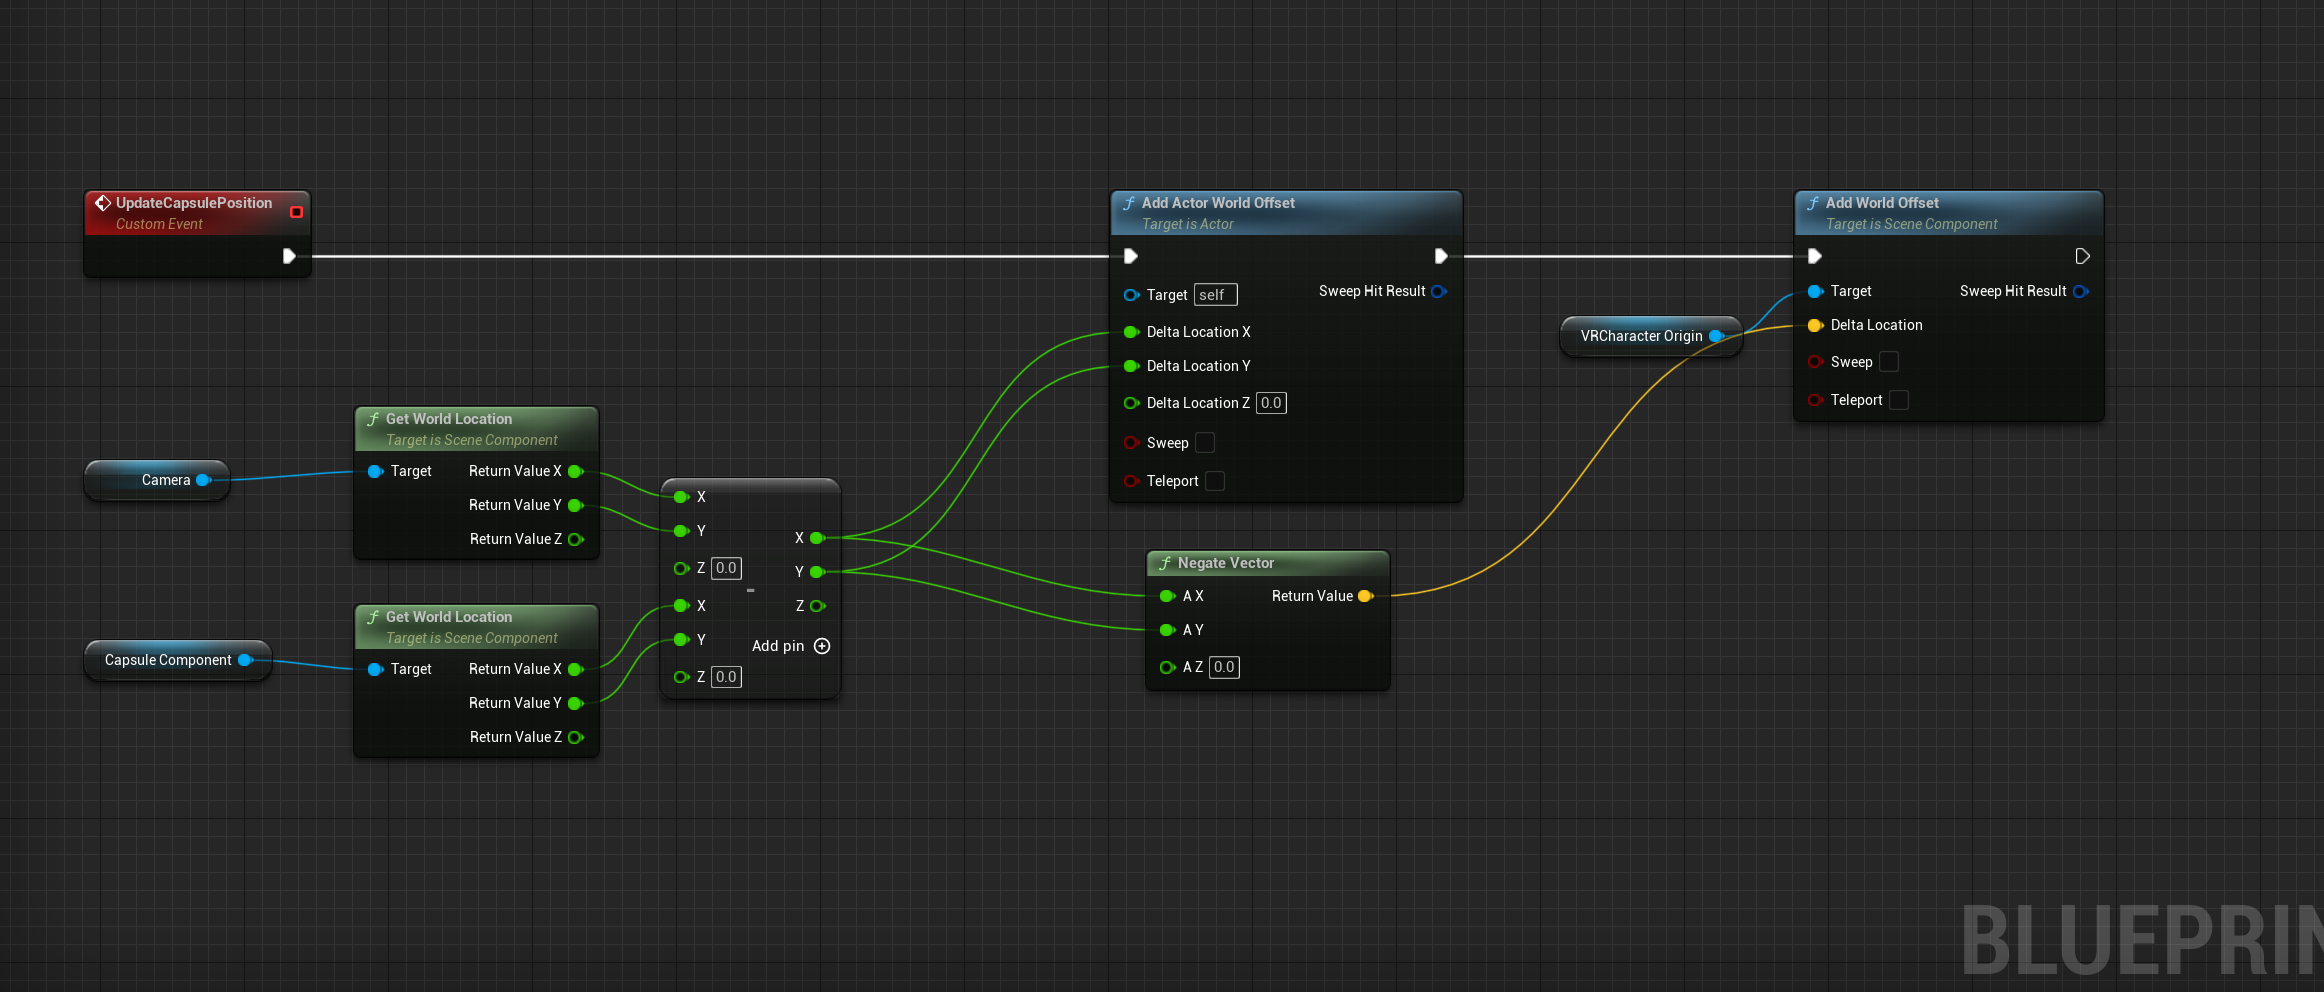
Connect the negate node up like so.
Make Sure Add Actor World Offset has teleport set to true and Add World Location has sweep set to true.
Then comment our code

Set teleport and sweep variables to true as in the image and comment the code.
At this point, our VR Pawns graph should look like this.
You’ll notice we are not firing our Custom Event “UpdateCapsule Position” node. There are two places we can fire the node, we could do it using our update capsule height timer every 0.02 seconds but this makes it difficult/impossible to lean over objects, like tables or benches. this si because our capsule updates all the time and never stops moving us back.
So it’s up to you have you want the movement to work, What I’m going to do instead is use our thumbstick to activate the position so if were move in the game then our position updates, but if we move in the real world we can walk through stuff and look over. I find it feels nicer.
Setting up Movement Controls
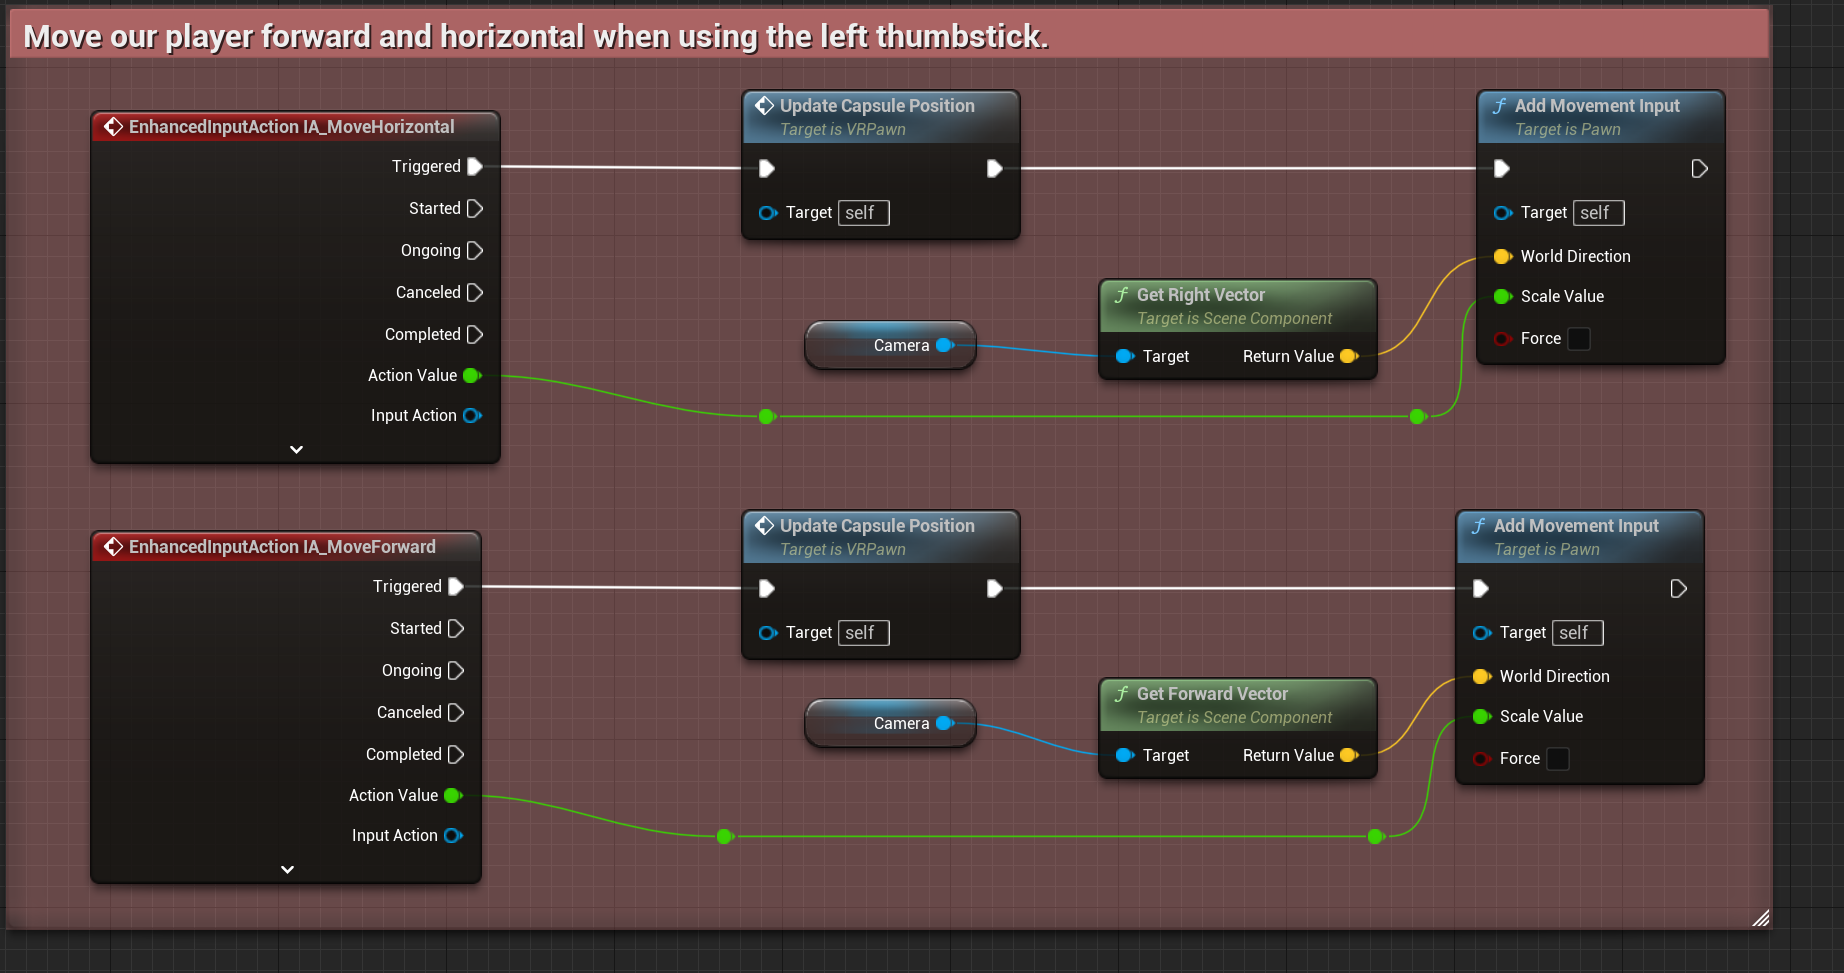
With the capsule height and position updating to track our camera position we can now move on to the movement, We will work on adding forward and side movement at the same time. Both setups are similar, they just involve slight changes here and there.
The first thing were going to do is create our input actions, We have already created them so we can search for them in the VRPawns event graph.

Adding our IA_MoveHorizontal and IA_MoveForward.
From the Triggered Execute pins in our input actions, we are going to fire the Update Capsule Position event we created in the last section. This will update our capsule position when ever the thumbstick is moved.
Remember, if you want to update on the tick to stop the player from looking/walking through things then you can fire this node using the “Update Capsule Height” Event.

Updating capsule position when thumbstick is pushed.
Search for a function called Add movement Input and connect it to the executable pin.

Add movement input nodes.
For our movement forward and back direction, were going to use our camera as the source, this means forward will be which ever direction the player/user is facing.
Start by dragging in the camera component so we have two references.
For our horizontal movement section, we will need to get the camera’s right vector.
For the Forward movement section, we will need to get the camera’s forward vector.
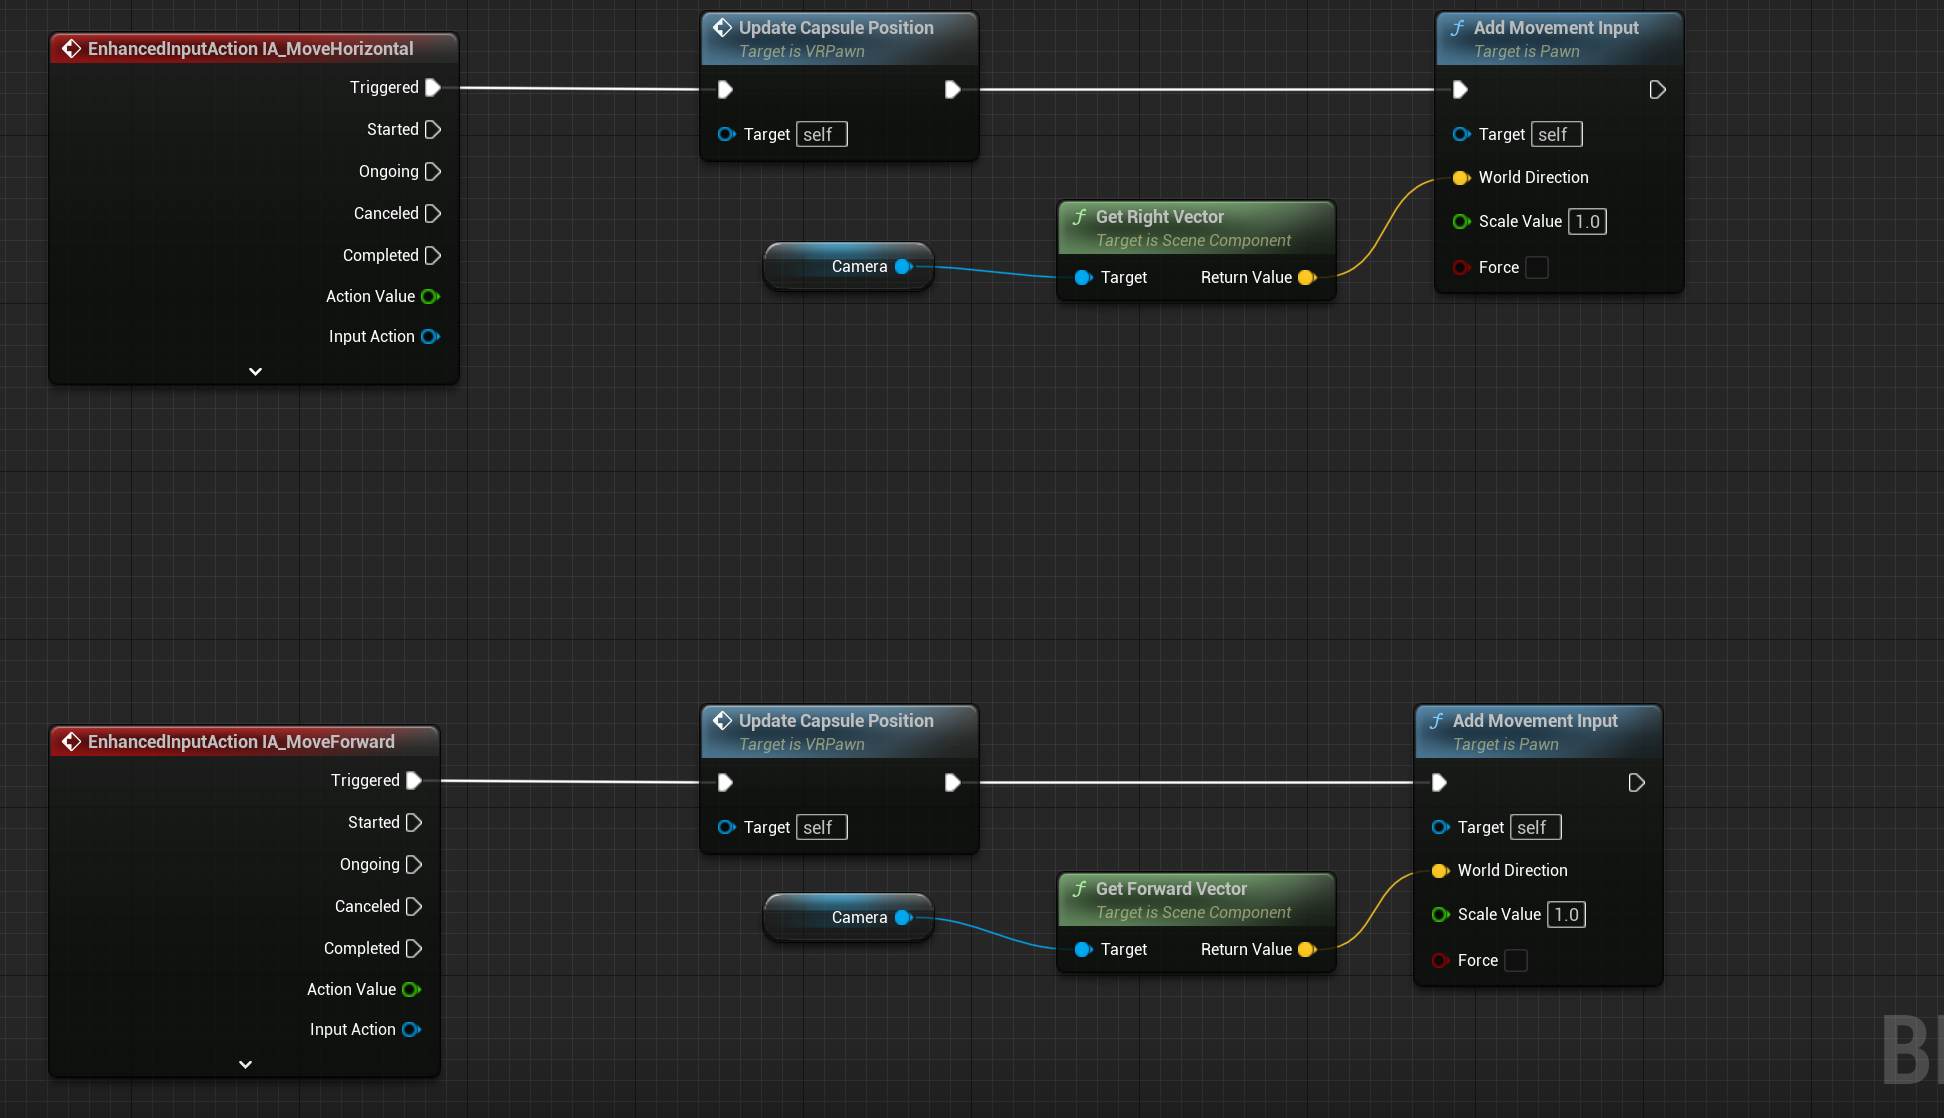
Getting our camera reference and finding the Right vector and forward for our movement direction.
Now our world direction is being set, we can connect our Action Value floats from the inputs to the scale value of our “Add Movement Input” functions.

Connect Action Value to Scale Value
Implementing Snap Rotation
The VRPawn has a snap rotation code already set up for us to use, however, it doesn’t work as it is. We need to modify it slightly. The first thing to do is open up the “Snap Turn” function which already exists in the graph.
Once it’s open Disconnect the Set Actor Location function at the end. Were doing this already with our room scale code.

Open the snap turn function and disconnect the Set Actor Location node
We can now go back to the event graph and change the Input Action from IA_Turn to IA_Snap_Turn_Right

Delete IA_Turn and replace it with IA_Snap_Turn_Right
It should look like this.

Snap turn input action using IA_Snap_Turn_Right
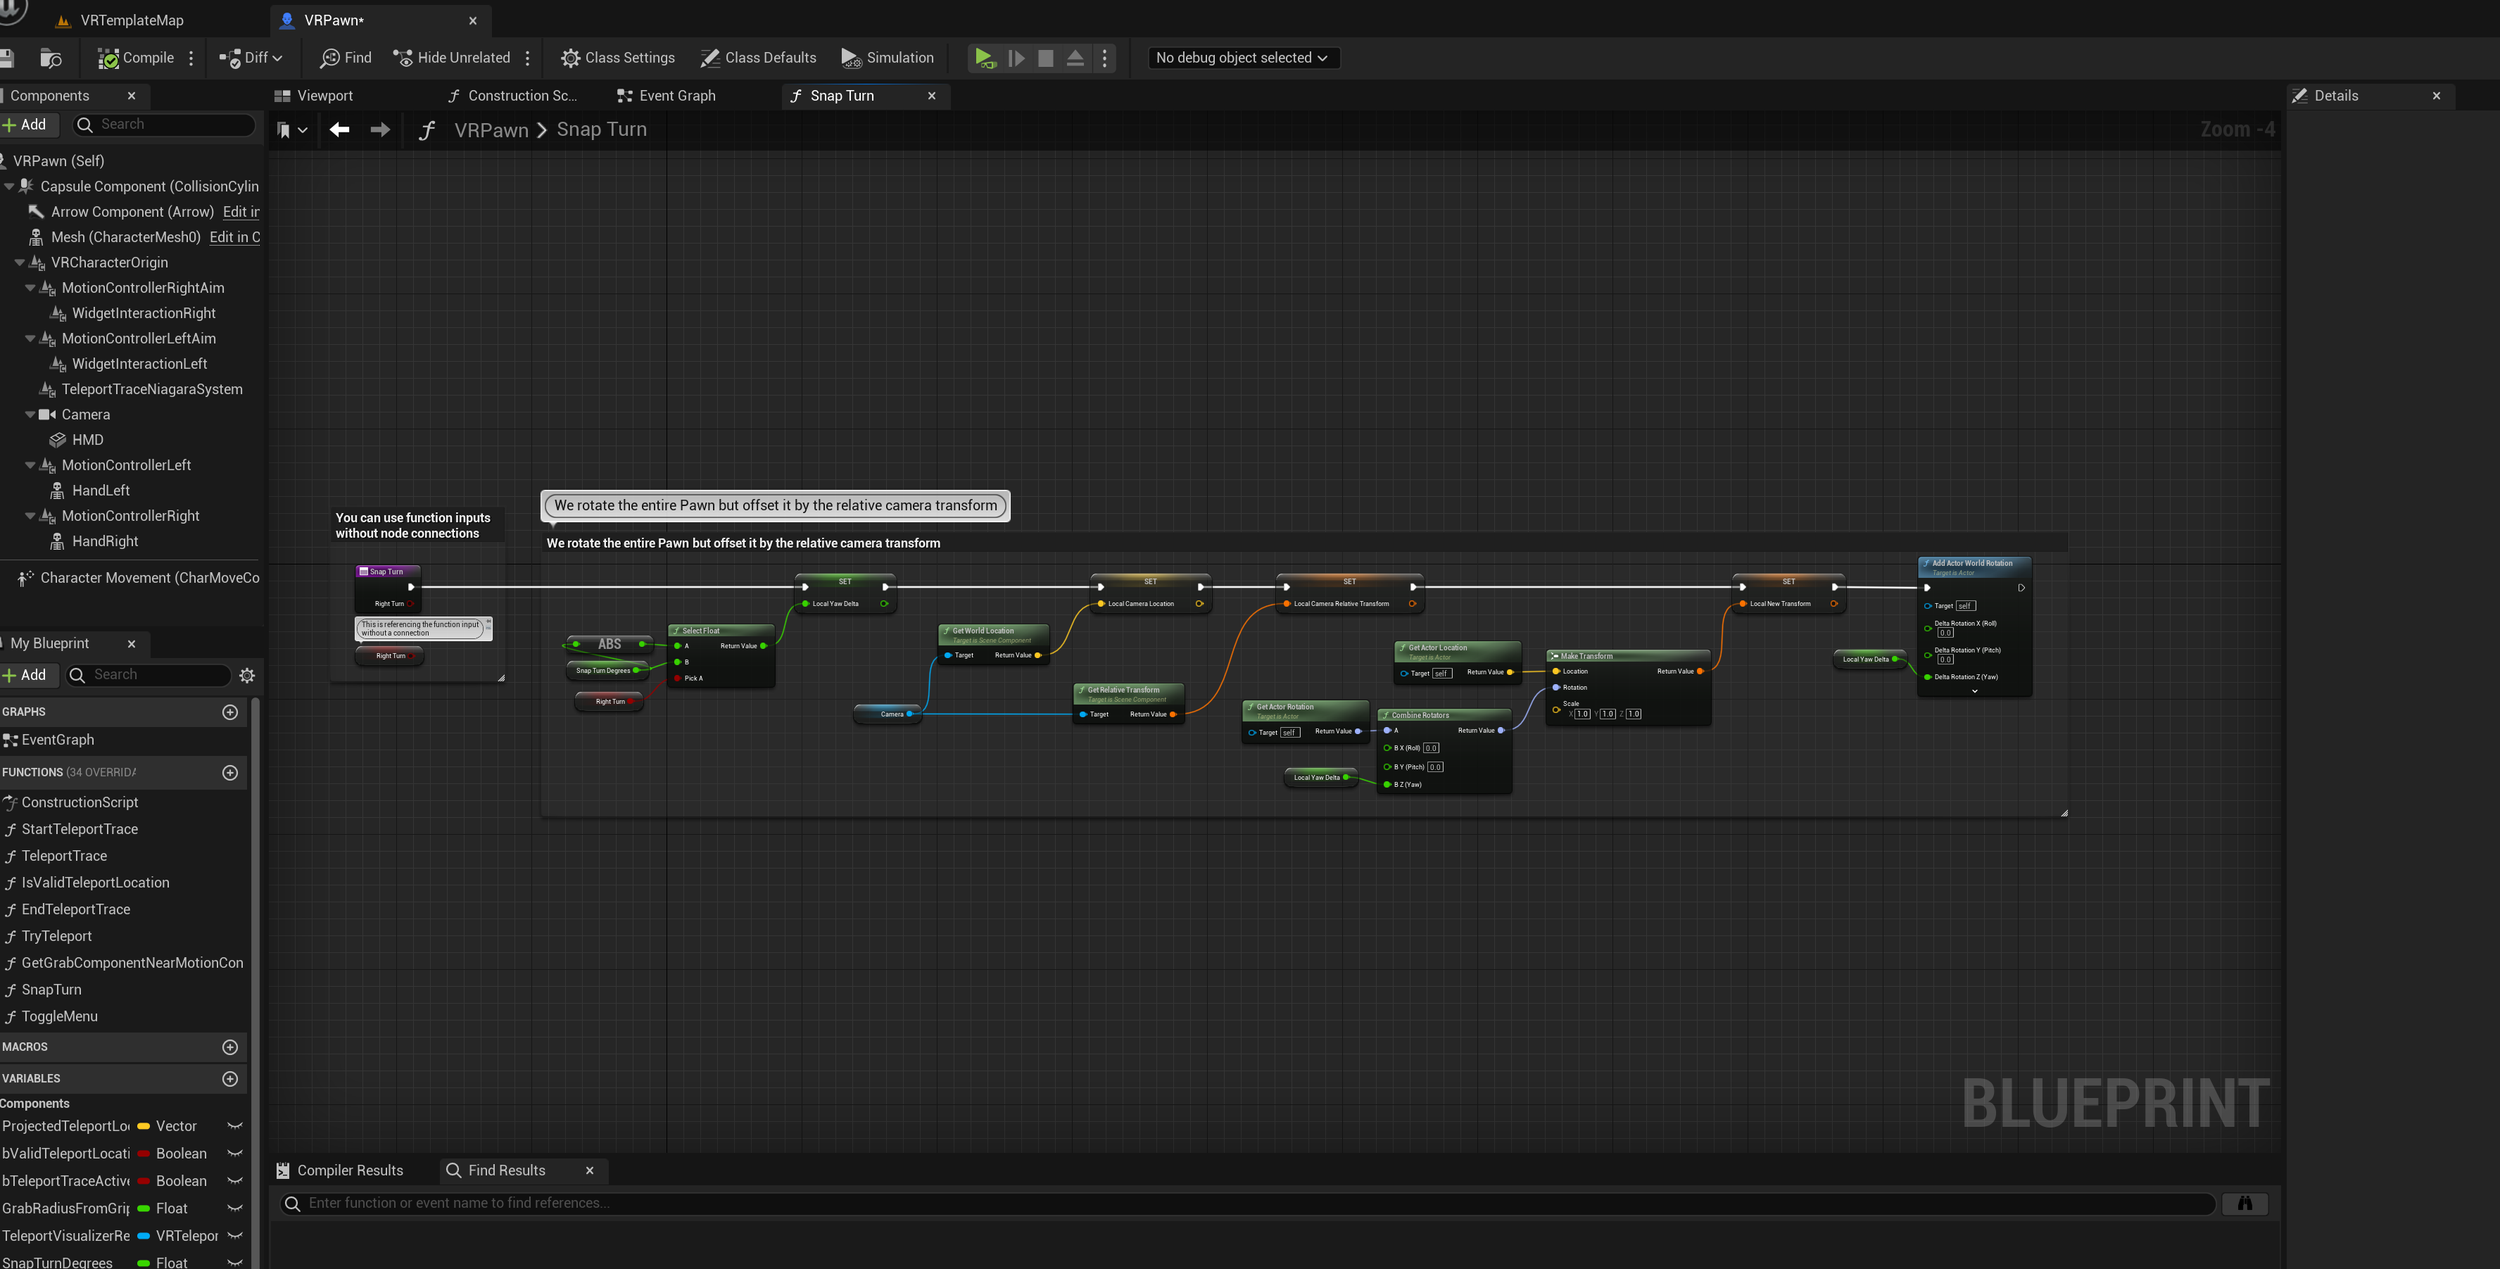
Snap turn function after removing Set Actor Location
For Snap turn to actually work with our player, we need to disable the “Use Controller Rotation Yaw”. This can be found when selecting the VRPawn (Self) Component and under the Pawn heading in the details panel

Set use controller rotation to false.
Getting Ready To Test Our Code
With snap rotation complete, we can now compile our code and get ready to test it. Before doing so we need to move the Player Start which exists in our level up so it no longer clips the floor. Or we wont spawn.

drag the player start-up and press the end on the key board to snap it to the floor.
Using VR Preview we can now jump in and test if our inputs/movement is working.
If VR Preview is greyed out, make sure your VR device is connected to either steam or oculus through your PC. Then relaunch your project and unreal should now detect it.

Success movement and snap turning work correctly. We can now move on to sprinting, jumping, and actor collisions.
Implement Jumping
Setting up Jump is incredibly simple. To implement it, all we need to do is add our IA_Jump and call a function that already exists called jump from the Input Actions Started Execute Pin.

Create IA_Jump and from “Started” search for the Jump Function.
We can now test our jump mechanic using VR Preview.

Implement Sprinting
To implement sprinting, we need to first create our IA_Sprint and set the max walk speed of your character movement

Add IA_Sprint and from character, Movement component set the Max walk speed.
You need to do this twice so that after the button has been released, it gets set back to the default walk speed which is 600 by default. It should look like the bellow image

Set max walk speed when pressing the left thumbstick
It’s difficult to see the speed change in the gif but it is visible in the headset.

Grabbing Actors (Custom Collisions)
If you have tried interacting with Actors, you’ll find that we get pushed away when we try and move, this is because our VRPawn capsule is colliding with our held actor and is trying to move us away from it.
To fix this we need to create a custom collision channel in our project settings so we can tell our player’s capsule to ignore them.
The first thing we need to do is open up our Project settings and go to the collisions section.

Open project settings and go to collision
Here we need to create a new Object Channel, Give it the name “VRInteractable” and set the default response to Block.
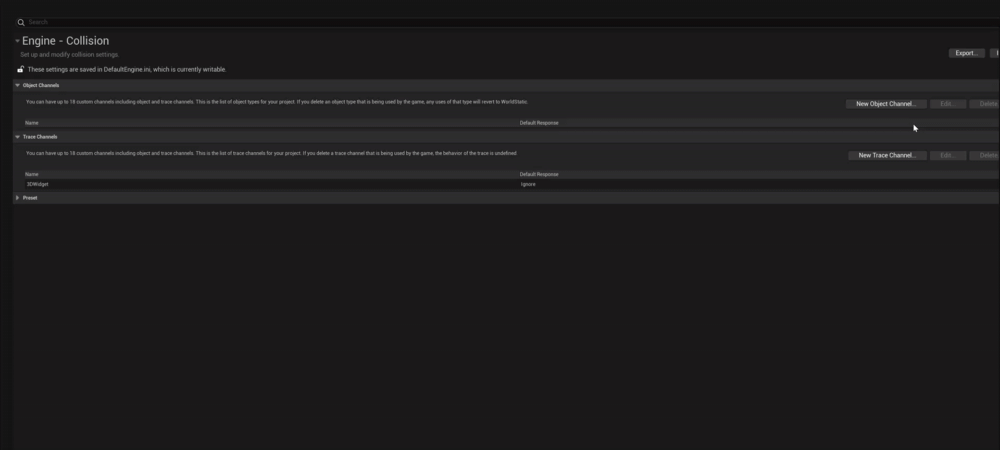
Create new channel object, Give it a name and set default response to block.

While we’re here, we also need to create a preset. This is done by opening the preset drop-down at the bottom of the list. And selecting “New”.

Preset drop down > New
- Name = VRInteractable
- CollisionEnabled = Collision enabled(Query and Physics)
- ObjectType = VRInteractable
- Description = Allows player to hold interactable objects with smooth locomotion.

Preset Settings
That’s our custom collision channels setup. Now to implement them in our actors.
Before moving on to the individual actors, we need to make some changes to the VR Pawn.
Open the VR pawn and select the Capsule Component, In the details panel scroll down to Collision.
Find the capsules collision settings.
We need to change our capsules collision preset to Custom and set the VRInteractable channel to Ignore.

Collision Preset to custom and VRInteractable to Ignore.
We now need to set our grab mechanics to acknowledge the vrinteractable collision channel or we won’t be able to pick up any of our actors once we change it.
The VRPawn contains a function called “GetGrabComponentNearMotionController”. This can be found in the functions list on the left. There is a node in there called “Make Array” which the default set to Physics Actor, we need to change this to VRIntertactable.

Open the function “GetGrabComponentNearMotionController” and set the Make array node to “VRInteractable”

Our player should now be able to grab actors using the collision channel “VRInteractable” We will need to change the current actors in the scene to make this work.
Start with the actor blueprint called Grabbable_SmallCube.


Open Grabbable_SmallCube
Select the static mesh in the Components section.
Set the collision Preset to VRInteractable.

Now we have changed the small_cubes collision Preset, We can do the same thing for the Pistol Actor in our scene.
This time were going to change the collision preset for the gun skeletal mesh.

- Open the pistol blueprint
- Select the skeletal mesh
- Change the collision preset to “VRInteractable”

Updating the Grab Component
Before we can pick up the actors we need to modify the included GrabComponent blueprint which is assigned to each actor.
Find the grab component in the Blueprints folder and open it up.

After opening the GrabComponent we need to find the event graph and change the In Collision Profile Name of the “Set Collision Profile Name” Function.
This must be spelled exactly the same as our custom collision channel, “VRInteractable”

So now all our actors are set up, you’ll find that the guns no longer spawn the projectile blueprints when you pull the trigger.
Shooting the Pistol and fixing the Projectile blueprint
To fix the projectile blueprint we need to first open it up.

Open the projectile blueprint
With the projectile open we need to select the Sphere Collision component and set its channel Responses for VRInteractable to Overlap. This will let our bullet spawn once it’s fired.


WERE FINISHED !!!!!!!!!!!
We can now test our project out.

Make sure to drop by the discord and check out our socials.